centos7中rocketmq的安装
文章目录[隐藏]
1.节点信息
192.168.0.208
192.168.0.209
ansible上的hosts配置
[root@MES-203 ~]# cat /etc/ansible/hosts

[rockq]
192.168.0.208 ansible_ssh_user=root ansible_ssh_pass=admin
192.168.0.209 ansible_ssh_user=root ansible_ssh_pass=admin
防火墙和时间同步参考redis,在搭建redis得时候已经操作过了
2.安装jdk
[root@MES-203 ~]# ansible rockq -m shell -a  "yum list java*"
[root@MES-203 ~]# ansible rockq -m shell -a "yum install -y java-1.8.0-openjdk-devel.x86_64"

[root@MES-203 nfsShare]#  ansible rockq -m shell -a "java -version"
3.搭建rocket Mq
创建目录
[root@MES-203 ~]# ansible rockq -m shell -a “mkdir -p /usr/local/rocketmq”
下载安装包&&解压
[root@MES-203 ~]# ansible rockq -m shell -a "cd /usr/local/rocketmq&& wget https://archive.apache.org/dist/rocketmq/4.9.3/rocketmq-all-4.9.3-bin-release.zip"

[root@MES-203 ~]# ansible rockq -m shell -a "cd /usr/local/rocketmq&& unzip rocketmq-all-4.9.3-bin-release.zip"
创建数据存储目录
[root@MES-203 ~]# ansible rockq -m shell -a "mkdir /usr/local/rocketmq/store"
[root@MES-203 ~]# ansible rockq -m shell -a "mkdir /usr/local/rocketmq/store/commitlog"
[root@MES-203 ~]# ansible rockq -m shell -a "mkdir /usr/local/rocketmq/store/consumerqueue"
[root@MES-203 ~]# ansible rockq -m shell -a "mkdir /usr/local/rocketmq/store/index"
修改RocketMQ的配置文件:conf/2m-noslave/broker-a.properties broker-b.properties(两台都要修改)
#所属集群名字
brokerClusterName=rocketmq-cluster
#broker名字,注意此处不同的配置文件填写的不一样
#broker-a.properties就写broker-a,broker-b.properties就写broker-b
brokerName=broker-a
#0 表示 Master,>0 表示 Slave
brokerId=0
#nameServer地址,分号分割
namesrvAddr=192.168.0.208:9876;192.168.0.209:9876
#在发送消息时,自动创建服务器不存在的topic,默认创建的队列数
defaultTopicQueueNums=4
#是否允许 Broker 自动创建Topic,建议线下开启,线上关闭
autoCreateTopicEnable=true
#是否允许 Broker 自动创建订阅组,建议线下开启,线上关闭
autoCreateSubscriptionGroup=true
#Broker 对外服务的监听端口
listenPort=10911
#删除文件时间点,默认凌晨 4点
deleteWhen=04
#文件保留时间,默认 48 小时
fileReservedTime=120
#commitLog每个文件的大小默认1G
mapedFileSizeCommitLog=1073741824
#ConsumeQueue每个文件默认存30W条,根据业务情况调整
mapedFileSizeConsumeQueue=300000
#强制删除文件间隔时间(单位毫秒)
#destroyMapedFileIntervalForcibly=120000
#定期检查Hanged文件间隔时间(单位毫秒)
#redeleteHangedFileInterval=120000
#检测物理文件磁盘空间
diskMaxUsedSpaceRatio=88
#存储路径
storePathRootDir=/usr/local/rocketmq/store
#commitLog 存储路径
storePathCommitLog=/usr/local/rocketmq/store/commitlog
#消费队列存储路径存储路径
storePathConsumeQueue=/usr/local/rocketmq/store/consumequeue
#消息索引存储路径
storePathIndex=/usr/local/rocketmq/store/index
#checkpoint 文件存储路径
storeCheckpoint=/usr/local/rocketmq/store/checkpoint
#abort 文件存储路径
abortFile=/usr/local/rocketmq/store/abort
#限制的消息大小
maxMessageSize=65536
#刷CommitLog,至少刷几个PAGE
#flushCommitLogLeastPages=4
#刷ConsumeQueue,至少刷几个PAGE
#flushConsumeQueueLeastPages=2
#刷CommitLog,彻底刷盘间隔时间
#flushCommitLogThoroughInterval=10000
#刷ConsumeQueue,彻底刷盘间隔时间
#flushConsumeQueueThoroughInterval=60000
#Broker 的角色
#- ASYNC_MASTER 异步复制Master
#- SYNC_MASTER 同步双写Master
#- SLAVE brokerRole=ASYNC_MASTER
#刷盘方式
#- ASYNC_FLUSH 异步刷盘
#- SYNC_FLUSH 同步刷盘
flushDiskType=ASYNC_FLUSH
#checkTransactionMessageEnable=false
#发消息线程池数量
#sendMessageThreadPoolNums=128
#拉消息线程池数量
#pullMessageThreadPoolNums=128
因为有两个master主节点,所以主节点1启动依赖broker-a.properties,主节点2启动依赖broker-b.properties,如果是三个Master,那么还会有一个broker-c.properties,以此类推。
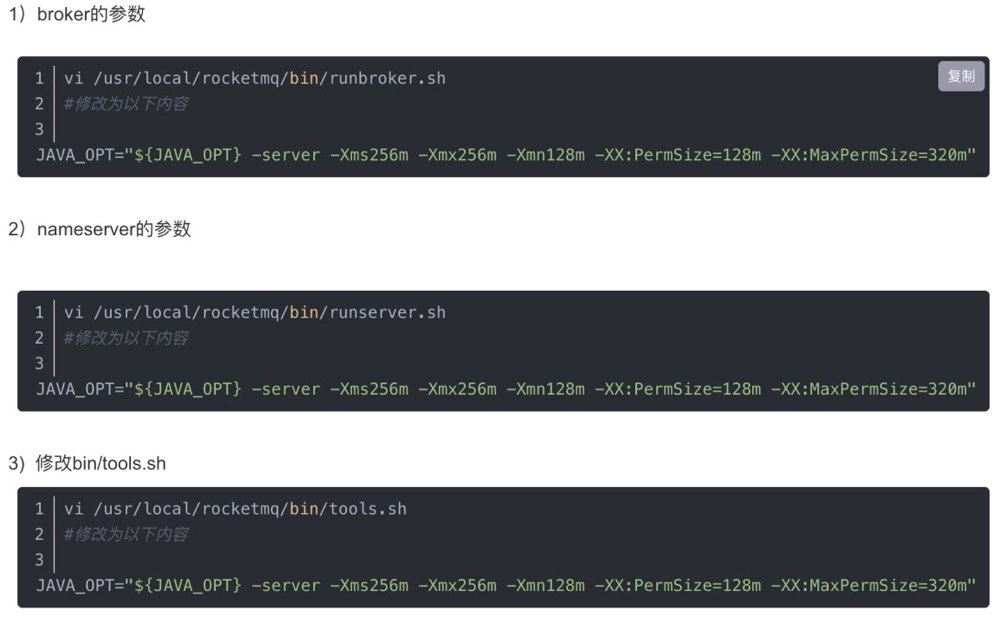
修改启动脚本参数(JVM参数的配置)(两台都要修改)
根据虚拟机情况修改
设置开机启动(两台都要设置)
[root@TRANSIT-208 system]# cat rocketmqnamesrv.service
[Unit]
Description=rocketmq - nameserver
Documentation=http://mirror.bit.edu.cn/apache/rocketmq/
After=network.target

[Service]
Type=sample
User=root
ExecStart=/usr/local/rocketmq/rocketmq-4.9.3/bin/mqnamesrv
ExecReload=/usr/bin/kill -s HUP $MAINPID
ExecStop=/usr/bin/kill -s QUIT $MAINPID
Restart=0
LimitNOFILE=65536

[Install]
WantedBy=multi-user.target
注意:208中配置broker-a.properties 209中配置broker-b.properties
[root@TRANSIT-208 system]# cat rocketmqbroker.service
[Unit]
Description=rocketmq - broker-master-1
Documentation=http://mirror.bit.edu.cn/apache/rocketmq/
After=network.target

[Service]
Type=sample
User=root
ExecStart=/usr/local/rocketmq/rocketmq-4.9.3/bin/mqbroker -c /usr/local/rocketmq/rocketmq-4.9.3/conf/2m-noslave/broker-a.properties
ExecReload=/usr/bin/kill -s HUP $MAINPID
ExecStop=/usr/bin/kill -s QUIT $MAINPID
Restart=0
LimitNOFILE=65536

[Install]
WantedBy=multi-user.target
设置开机启动并启动
[root@MES-203 nfsShare]#  ansible rockq -m shell -a "systemctl enable rocketmqnamesrv&&systemctl enable rocketmqbroker"

[root@MES-203 nfsShare]#  ansible rockq -m shell -a "systemctl start rocketmqnamesrv&&systemctl start rocketmqbroker"
4.搭建console
apiVersion: apps/v1
kind: Deployment
metadata:
  name: rocketmq-console
  namespace: middleware
spec:
  replicas: 1
  selector:
    matchLabels:
      app: rocketmq-console
  strategy:
    rollingUpdate:
      maxSurge: 100%
      maxUnavailable: 0
    type: RollingUpdate
  template:
    metadata:
      creationTimestamp: null
      labels:
        app: rocketmq-console
    spec:
      restartPolicy: Always
      containers:
        - image: styletang/rocketmq-console-ng
          imagePullPolicy: IfNotPresent
          name: rocketmq-console
          resources:
            requests:
              cpu: 500m
              memory: 1Gi
            limits:
              cpu: 500m
              memory: 2Gi
          ports:
            - containerPort: 8080
              protocol: TCP
          env:
            - name: JAVA_OPTS
              value: "-Drocketmq.namesrv.addr=192.168.0.208:9876;192.168.0.209:9876 -Dcom.rocketmq.sendMessageWithVIPChannel=false"

---
apiVersion: v1
kind: Service
metadata:
  name: rocketmq-console
  namespace: middleware
  labels:
    app: rocketmq-console
spec:
  ports:
    - port: 8080
      targetPort: 8080
      nodePort: 30085
  type: NodePort
  selector:
    app: rocketmq-console
参考文献
安装文档
https://blog.csdn.net/wangjinduo35056/article/details/88341798
https://blog.csdn.net/qq_34021712/article/details/78169014
开机启动
https://www.cnblogs.com/fuhai0815/p/14272267.html
console容器化
https://zhuanlan.zhihu.com/p/363349083版权声明:原创作品,允许转载,转载时请务必以超链接形式标明文章 原始出处 、作者信息和本声明。否则将追究法律责任。
转载请注明来源:centos7中rocketmq的安装 - 多知在线